
.NET’s NuGet package manager is fantastic, but let’s face it—its client-side package management is awful. There have been some attempts at managing client-side packages with LibMan, but my personal experience is that it is very flaky and not very feature rich.
Today, I am going to show you how to use Node Package Manager (NPM) in a .NET project. And I am going to fully automate the process so that client-side libraries are restored just like NuGet packages, so your local development process is simply build and run.
A video run through of this tutorial can be found here.
Installing NPM Packages
First, ensure that you have Node.js and NPM (the package manager for Node.js) installed. See: https://nodejs.org/en
Generate a package.json file to your project by navigating to the root of your project folder and running:
npm init -yWe will now modify the package.json file, specifying that the type is module (the modern JavaScript module system) and add a dependencies section and list any packages that you wish to install. In this example, we will install Bootstrap and jQuery:
{
  "name": "example",
  "type": "module",
  "version": "1.0.0",
  "description": "",
  "main": "",
  "scripts": {
    "test": "echo \"Error: no test specified\" && exit 1"
  },
  "author": "Terry Mace",
  "dependencies": {
    "bootstrap": "5.2.x",
    "jquery": "3.x"
  }
}
Now if you run npm install, the dependencies listed will be installed. However, these will be installed in a node_modules folder, and CSS/JS files will not be accessible from a browser. By default, static files are only accessible from wwwroot.
Copy Files From node_modules to wwwroot
To copy your npm files to wwwroot, we will use Gulp. Gulp is a JavaScript task runner.
In your package.json file, add the following devDependencies:
{
  "name": "example",
  "type": "module",
  "version": "1.0.0",
  "description": "",
  "main": "",
  "scripts": {
    "test": "echo \"Error: no test specified\" && exit 1"
  },
  "author": "Terry Mace",
  "dependencies": {
    "bootstrap": "5.2.x",
    "jquery": "3.x"
  },
  "devDependencies": {
    "gulp": "^5.0.0",
    "gulp-clean": "^0.4.0"
  }
}
Next, create a gulpfile.js file in the root of your project and add the following:
import gulp from "gulp";
import clean from "gulp-clean";

const paths = {
    bootstrap: {
        src: "node_modules/bootstrap/**/*",
        dest: "wwwroot/lib/bootstrap/"
    },
    jquery: {
        src: "node_modules/jquery/**/*",
        dest: "wwwroot/lib/jquery/"
    }
};

// Task to clean the wwwroot/lib folder
gulp.task("clean", function () {
    return gulp.src("wwwroot/lib/", { read: false, allowEmpty: true })
        .pipe(clean());
});

// Task to copy Bootstrap files
gulp.task("copy-bootstrap", function () {
    return gulp.src(paths.bootstrap.src)
        .pipe(gulp.dest(paths.bootstrap.dest));
});

// Task to copy jQuery files
gulp.task("copy-jquery", function () {
    return gulp.src(paths.jquery.src)
        .pipe(gulp.dest(paths.jquery.dest));
});

// Combined copy task
gulp.task("copy", gulp.parallel("copy-bootstrap", "copy-jquery"));

// Task to clean and then copy files
gulp.task("cleanAndCopy", gulp.series("clean", "copy"));
Let’s break down what we are doing here.
- We import the required modules: gulp and gulp clean. We’re using ES module syntax (
importinstead ofrequire), which is a modern approach to JavaScript module handling. If your environment doesn’t support ES modules, you might need to userequire()instead. - we define an object called
pathsthat holds the source and destination paths for Bootstrap and jQuery: - Before we copy new files, we remove any outdated or unnecessary files from the destination folder by creating a task called
clean:gulp.src(paths.dest, { read: false, allowEmpty: true })selects the destination folder:read: falseimproves performance since we don’t need to read file contents before deleting.allowEmpty: trueensures that Gulp doesn’t throw an error if the directory is already empty.
.pipe(clean())actually removes the files.
- We define a task called
copy-bootstrapto copy Bootstrap files fromnode_modulesto ourwwwroot/libfolder:gulp.src(paths.bootstrap.src): Selects all Bootstrap files..pipe(gulp.dest(paths.bootstrap.dest)): Copies them to the destination folder.
- We do the same thing for jQuery with a task called
copy-jquery - Since copying Bootstrap and jQuery are independent tasks, we run them in parallel using
gulp.parallelwhich runs both tasks simultaneously. - We create a task called
clean-and-copythat first cleans thewwwroot/libdirectory and then copies the necessary files.
Now if we call gulp clean-and-copy the installed files will be copied from node_modules to wwwroot\lib. To have this task automatically triggered after an npm install, we add a postinstall script to our package.json file where we call gulp clean-and-copy:
{
  "name": "example",
  "type": "module",
  "version": "1.0.0",
  "description": "",
  "main": "",
  "scripts": {
    "test": "echo \"Error: no test specified\" && exit 1",
    "postinstall": "gulp clean-and-copy"
  },
  "author": "Terry Mace",
  "dependencies": {
    "bootstrap": "5.2.x",
    "jquery": "3.x"
  },
  "devDependencies": {
    "gulp": "^5.0.0",
    "gulp-clean": "^0.4.0"
  }
}
Now when we run npm install, the following will happen:
- Any packages specified in your
package.jsonfile will be installed in thenode_modulesdirectory. - All files in the
wwwroot/lib/folder are deleted. - The files specified in the copy task are copied from
node_modulesinto their respective locations inwwwroot/lib/.
Note the clean step in the workflow. Deleting all of the files within the lib folder ensures that if you change your package version or remove a package from your package.json, this is reflected in your lib folder.
If you are using git, it is advisable that you add both node_modules/ and wwwroot/lib/ folders to your .gitignore to prevent committing them to source control. This can be done by adding:
**/node_modules
**/wwwroot/lib
Automating NPM Install
So, we can now install NPM packages in our project and have them moved to wwwroot, but we still have to manually call npm install. This may be a perfectly fine workflow for your use case. However, if you want to automate this call, this can be done by adding a build event to run npm install. Do this cautiously though, because npm install will be called every time you build your project which will add load time. I will now outline how to do this.
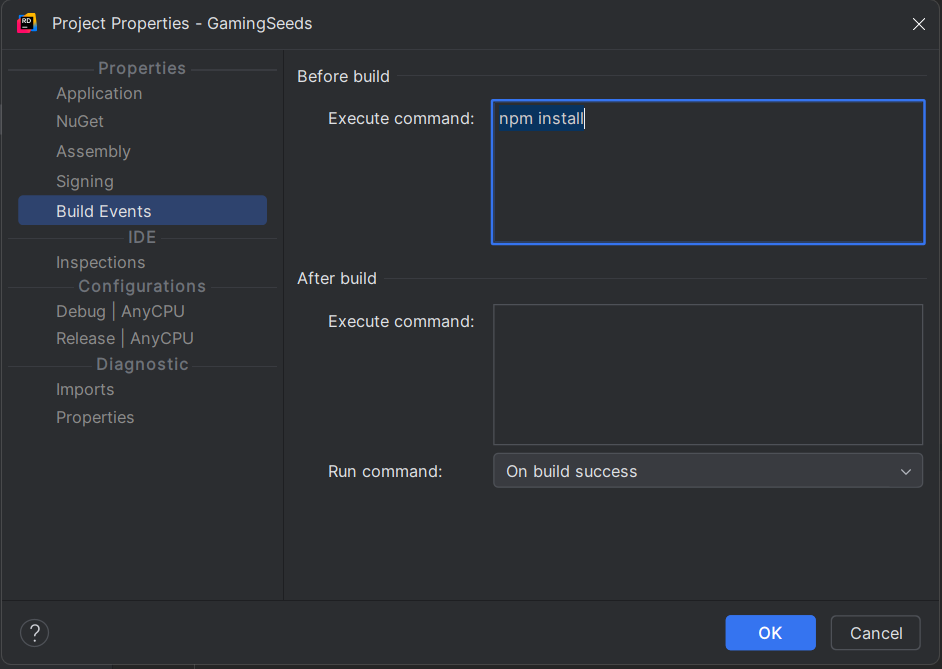
In the solution explorer, right click on the project contain the package.json file and select properties. The select Build Event and in the pre-build event input add npm install.
Conclusion
We now have Node packages being installed in a .NET project using NPM.
- No Manual Steps: Developers don’t have to remember to run
npm install. - Fully Automated: Integrated seamlessly into the build process.
By following these steps, you can maintain client-side dependencies just like NuGet packages and avoid the headaches of manually restoring front-end libraries. Enjoy your streamlined .NET + NPM workflow!
Comments are closed